
The view that opens when ideCAD ODT is run is called the ODT interface. In the interface, there are sections such as menus, command icons, toolbars, design follow-up window for using ideCAD ODT.
At a Glance
When you run the program, you will see a design screen with 4 windows.
-
It is the Front view in the upper left corner . Usually the design takes place in this window. All drawings made in this window will be reflected in other windows.
-
It is the Plan view in the lower left corner . The image in this window is the way you will see the door or window you designed in ideCAD Architecture.
-
It is the 3D Virtual Image window in the upper right corner . Changes you make on the facade or plan will also be reflected in this window.
-
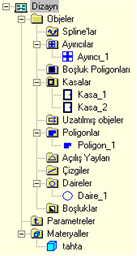
In the lower right corner is the Project Follow-up window. You can see all the objects you create in this window in a hierarchical structure. You can access the properties of the objects by double clicking on the names of these objects or you can delete the objects by pressing the Del / Delete key.
Creating an Object
After selecting one of the object creation commands, you can click one of the Front or Plan windows to place your first point. Following this, you can place the necessary points and create your objects. Here you will encounter two different situations.
Two-node objects
The rectangular and circular case are examples of this. After clicking your first point, the image of the case will begin to move depending on the mouse pointer. The object will be created when you place it at your second point.
Multi-node objects
Objects such as polygons and splines can be given as examples. After you click your first point, the first piece of the object will start moving depending on the mouse cursor. After placing the second and other points, it will be enough to click the Finish button in the dialog that appears on the screen to finish the drawing . If you think that a few points are wrong on the object you have drawn, you can click the Undo button to delete the points you have drawn in order and return.
Bill Tracking Window
-
You can see all the objects you create in a hierarchical structure.
-
When you double click on the name of any object, its properties will be displayed.
-
When an object is selected from any window, the color of its name in this window will change from black to green.
Tracking Bill Selected
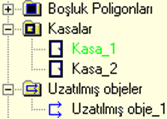
Bill Tracking Hierarchy
Right Click Menu
-
When you click with the right mouse button on a non-object space in one of the windows, the menu in Figure 1 will appear.
-
When you click with the right mouse button on an object in one of the windows, the menu in Figure 2 will appear.
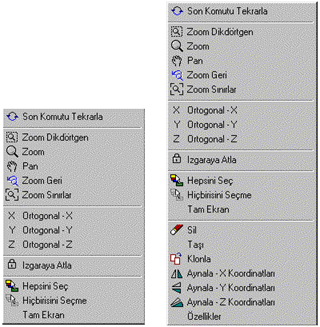
Figure 1 Figure 2
Entering Object Properties
-
Click on the object (frame, polygon, opening arc…) with the right mouse button.
-
Select the Properties command at the bottom from the Right Click menu that comes up .
Not
Each object type has its own specific Properties section.
Next Topic