
Necessary design settings are made for door-window design. These settings are also available in the Settings menu one by one.
Setting Design Wall Thickness
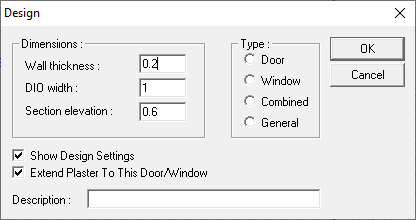
You can determine the thickness of the wall your window will sit on. This will most visibly affect the Space polygon.
-
Click Settings/Set Design Wall Thickness .
-
Enter a value for the wall thickness in the window that opens.
Setting Design Dio Width
You can determine the width of your design. For example, you will design a 3 meter wide window, it will make your job easier to start by setting the DIO width to 3 meters before starting the window.
-
Click the Settings/Set DIO Set Width row.
-
As soon as you click, your dio design width on the x axis will move with your mouse movement.
-
If you want, you can adjust the width by pressing the X key and entering a value. When you press the Enter key after entering the value, the design width will be adjusted.
-
If you like the design width of the mouse, depending on the value of the width of the lower right corner moves (X) can be set by clicking reaches the desired width checking.
Setting Design Dio Height
You can determine the height of your design. As an example, you will design a 3 meter high window, it will make it easier to start by setting the DIO height to 3 meters before starting the window.
-
Click the Settings/Set DIO Adjust Height line.
-
As soon as you click, your dio design height on the z axis will move with your mouse movement.
-
If you want , you can adjust the height by pressing the Z key and entering a value. When you press the Enter key after entering the value, the design height will be adjusted.
-
If you like the design height of the mouse while moving the lower right corner, depending on the height (Z) control you can adjust by clicking CAE reaches the desired height.
Note
-
For all DIOs you need to make the Dio Design Settings correctly. Because all Dios are sized with these settings in the ideCAD Architecture program. You can do this after the window is finished, but it will be useful to finish this process before starting the design in order to avoid sizing errors during design.
Setting Section Elevation
You can adjust the section elevation of your design. The section elevation will determine where the next (top) image on the facade will appear in the plan.
-
Click the Settings/Set Section Elevation row.
-
When you click, the elevation line will appear on the front screen and will move with your mouse movement.
-
If you want , you can adjust the height by pressing the Z key and entering a value. When you press the Enter key after entering the value, the section elevation will be adjusted.
-
If you want, you can adjust the section elevation by controlling the height value (Z) from the lower right corner while moving depending on the mouse and clicking when you reach the desired height.
Next Topic