
Beginners – Architectural BIM Workflows with ideCAD for Architects and Structural Engineers
Beginners – Structural BIM Workflows with ideCAD for Structural Engineers
Residential Project in ideCAD – Full BIM Workflow from Start to Finish
Watch a complete BIM workflow for a residential building project using ideCAD—from the first wall to the final construction drawings. This step-by-step playlist covers architectural modeling, structural analysis, reinforced concrete & steel design, and automated detailing, all within a single integrated platform. Designed for architects, engineers, and BIM professionals who want to deliver residential projects faster, more accurately, and fully code-compliant. In This Playlist: Project setup and architectural modeling Story definitions, walls, slabs, and openings Structural system modeling and load application Concrete and steel design (beam, column, slab, rebar, connection) Automated detailing and drawing generation IFC export for BIM collaboration 🎯 All steps follow a real-world residential project example using ideCAD Residential Building, ideCAD Tutorial, BIM for Housing, Architectural Design, Structural Engineering, Concrete Design, Steel Detailing, BIM Workflow, Building Information Modeling, Complete Project, Construction Drawings, IFC Export, ideCAD Residential, AEC Software.
https://www.youtube.com/playlist?list=PLxqm7PJuC2PszEtXjiiWhENO2lquMW4Eg
-
Part 1. Create a Project -
Part 2. Create Lot Lines -
Part 3. Create the Axes -
Part 4. Create Walls -
Part 5. Create the Columns -
Part 6. Create the Zones -
Part 7. Create the Beams -
Part 8. Create the Slabs -
Part 9. Place Doors -
Part 10. Place the Windows -
Part 11. Create the Curtain Wall -
Part 12. Copy Base Story to Upper -
Part 13. Create the Upper Story Walls -
Part 14. Create the Upper Story Zones -
Part 15. Create the Upper Story Beams -
Part 16. Create the Upper Story Slabs -
Part 17. Place the Upper Story Doors -
Part 18. Create the Stairs and Railings -
Part 19. Create the Patio Railings -
Part 20. Create the Steel Columns -
Part 21. Create the Steel Beams -
Part 22. Create the Steel Purlins -
Part 23. Create the Sheetings -
Part 24. Create the Roof -
Part 25. Create the Gutter and the Rainwater Pipe -
Part 26. Create the Raft Foundation -
Part 27. Create the Terrain -
Part 28. Create the Swimming Pool -
Part 29. Create the Facade Elements -
Part 30. Place the Furnishings -
Part 31. Create the Horizontal Plan Section -
Part 32. Create the Section and Elevation Views -
Part 33. Add Dimensions -
Part 34. Create the Layout -
Part 35. Create the Render -
Part 36. Create the Animation -
Part 37. Collaborate The ideCAD One Model -
Part 38. Get the ideYAPI Building Information Model -
Part 39. Get the IFC Building Information Model -
Part 40. Get the 2D / 3D Drawings -
Part 41. Create a New Structural Building Information Model -
Part 42. Examine the Structural System -
Part 43. Use the Wizard for Analysis Settings -
Part 44. Optimize the Structural System -
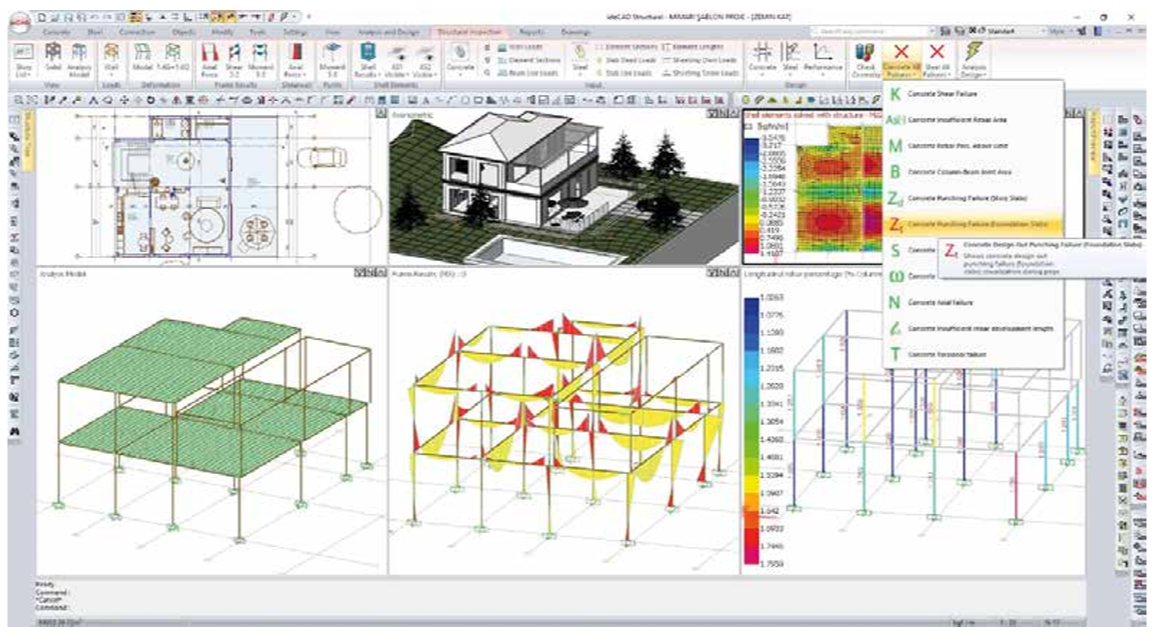
Part 45. Check Geometry and Failure -
Part 46. Fix the Failures -
Part 47. Examine the Analysis Model -
Part 48. Examine the Load Model -
Part 49. Analysis and Design -
Part 50. Review Analysis Results -
Part 51. Review Concrete Design -
Part 52. Review Steel Design -
Part 53. Modelling Steel Connections - 1 -
Part 54. Modelling Steel Connections - 2 -
Part 55. Generate Select Reports -
Part 56. Generate Concrete Design Reports -
Part 57. Generate Steel Design Reports -
Part 58. Create Concrete Drawings -
Part 59. Create Steel Drawings