
With the Pile Settings command, settings such as pile size, drawing, material selection, structural material are accessed.
Location of Pile Settings Dialog
The Pile that appears on the screen after the pile command is run is available in the auxiliary toolbar.
You can also access it under the Concrete tab Foundation title in the ribbon menu .

General Settings Tab

|
Specifications |
|---|
|
Pile ID Name the pile object. This name is the name that will be used in drawing, report and quantity. |
|
Outer frame color Give the outer frame color of the pile object. Select the color you want by clicking the color palette. |
|
Inner frame color Give the inner frame color of the pile object. Select the color you want by clicking the color palette. |
|
Linetype The line type of the line forming the pile is selected in the plan. Clicking the down arrow buttons to the right of the boxes opens the list of line types. From this list, the desired line type is selected by clicking with the left mouse button. |
|
Radius The radius value of the pile object. This value given when defining the pile object can also be changed in the dialog. |
|
Point count The excavation, which is a circular object, is the point value of the pile that sharpens the circular feature in the drawing. As the value increases, the drawing of the pile is done by connecting more points. |
|
Height It is the height value of the pile object. This value given when defining the pile object can also be changed in the dialog. |
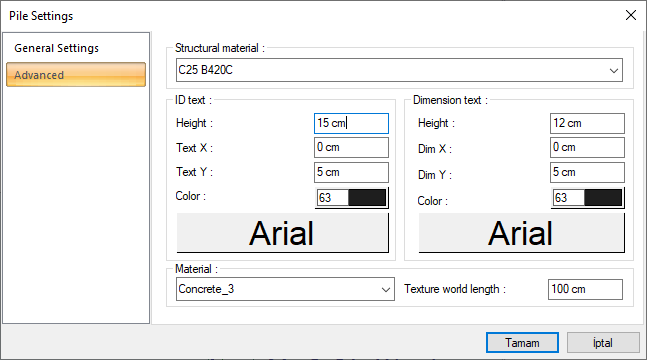
Advanced Tab
|
Specifications |
|---|
|
ID text 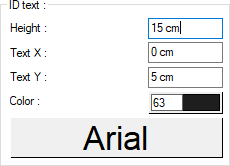
The height of the pile name text is entered. The color box is slid over the color palette that is opened by clicking with the left mouse button and holding down the button. The button is released when the desired color is reached. The color box turns into the selected color. If clicked together with the Shift key, the pen thickness of the relevant color can be adjusted. If the button just below is clicked, the Font Settings dialog opens. From this dialog, the Column Header Name Text, font is set. Articles are written horizontally. |
|
Dimension text 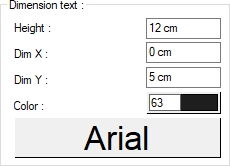
The height of the pile dimension text is entered. The color box is slid over the color palette that is opened by clicking with the left mouse button and holding down the button. The button is released when the desired color is reached. The color box turns into the selected color. If clicked together with the Shift key, the pen thickness of the relevant color can be adjusted. If the button just below is clicked, the Font Settings dialog opens. |
|
Text X/Text Y X and Y coordinates are entered according to the upper left corner of the column heading of the Pile ID text. Text If the X value is positive, the ID text will move to the left, if it is negative, it will move to the right. Text scrolls up if the Y value is positive, and down if it is negative. |
|
Dim X/Dim Y X and Y coordinates are entered according to the upper right corner of the column heading of the Pile Dimension text. If the dimension X value is positive, the dimension text shifts to the left, if it is negative, it shifts to the right. If the dimension Y value is positive, the dimension text will scroll up, and if it is negative, it will scroll down. |
Next Topic