Render Settings
Render; It is the process of calculating the light clusters emitted by the effects of objects, lights and reflections in the scene from each other. Jpeg, bmp, tiff etc. can be saved as extension. Render settings can be opened by clicking the render command.
Location of the Render Command
You can access the Render command from the menu that opens by clicking the right button of the mouse in the perspective window.
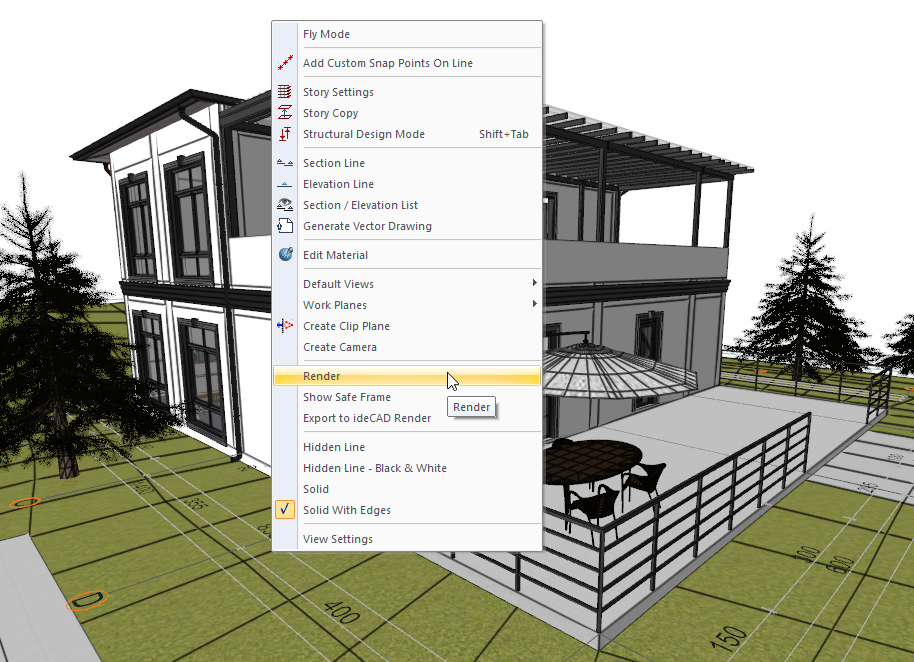
In the Architectural Program
You can access it under the ribbon menu, Rendering tab, Render heading.

In the Structural Program
You can access it under the ribbon menu, View tab, View heading.

General Tab
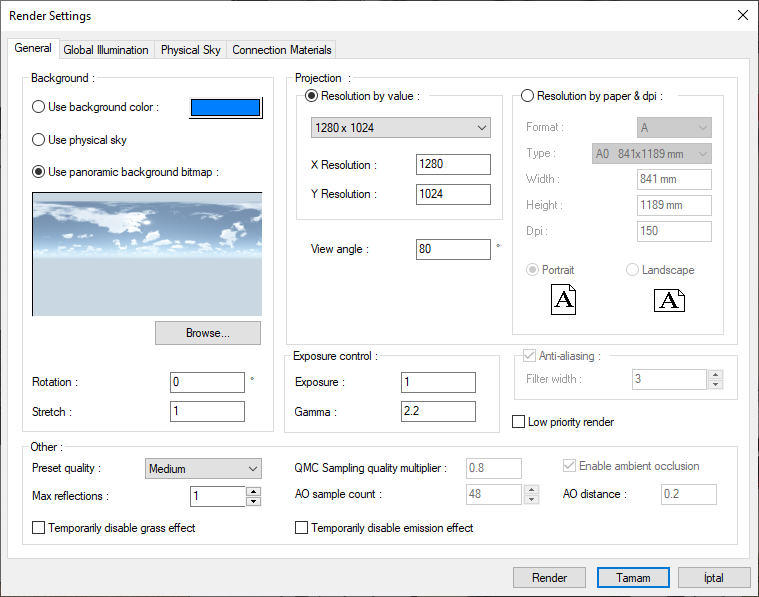
Specifications |
|---|
Use background color  The selected color is used as the background color of the render scene. |
Use physical sky  It determines the color of the sky and the nature of daylight according to the position of the sun. |
Use panoramic background bitmap 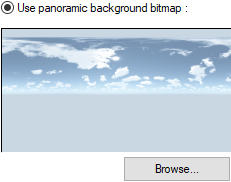 The images in the SKY folder in the ideCAD Architecture installation folder are rendered using. These images are placed in such a way that they surround a full sphere (world). Therefore, whichever direction the camera view turns, the sky will be in the background of the scene. |
Stretch  When the stretch value is changed, the background can be shifted up and down and the location of the horizon line can be adjusted.  |
Rotation  The position of the clouds is adjusted by rotating the angle of the panoramic background 360 °.  |
Resolution by values - X/Y Resolution 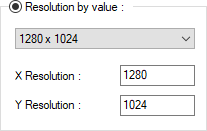 The x and y dimensions of the image to be displayed are entered in pixels. The higher the resolution, the longer the render size, the longer the render time. |
View angle  It is used to change the perspective of the render without changing the location of the camera. This feature is the angle at which the camera lens can view. While trying to capture the appropriate angle with camera movements, especially in small indoor volumes, the camera moves out of the space and it is difficult to capture a good render frame. In such cases, the viewing angle can be changed. 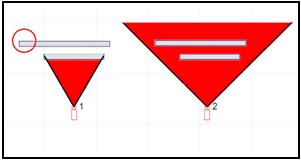 In the figure, the distance between the 1st and 2nd cameras is the same from the wall, but increasing the angle of view of the 2nd camera allows you to see the area inside the circle on the back wall, which cannot be seen in the rendering with the 1st camera. In other words, it is the process of looking at a wider angle without changing the position of the camera. However, as the angle of view expands, the area to be rendered is fixed (such as 1024x768), so there is a divergence in perspective.  |
Resolution by paper & dpi  According to the selected paper size, the optimum X and Y resolution of the render will be determined automatically. The higher the paper size and dpi quality, the larger the resolution of the render. Large papers should not be printed with low resolution rendering. In this case, there will be distortions (pixelations) in the printing of the picture and a good visual presentation will not be obtained. |
Format  One of the standard forms or the free option is selected. |
Type  The paper types belonging to the formats are included in the list. |
Width/Height  Width and heights of standard forms come automatically and are fixed. The width and height can be specified in the free option. |
Dpi  It can be defined as print quality. As the Dpi value increases, the quality of the photo print increases and the X and Y resolution dimensions of the render increase. For example, for 150 dpi, the optimum image size of 1754x2480 pixels in printing on A3 paper is sufficient, while for 300 dpi, 3508x 4961 pixels will be. |
Exposure  It is used to increase or decrease the brightness level of the whole picture. The standard value is 1. The higher the value, the higher the luminance level. Since changing with numerical values such as 2,3,4 ... 10 will cause unrealistic explosions in colors, rendering by trying it step by step with small changes such as 1.1, 1.2, 1.3 will give you a better result. 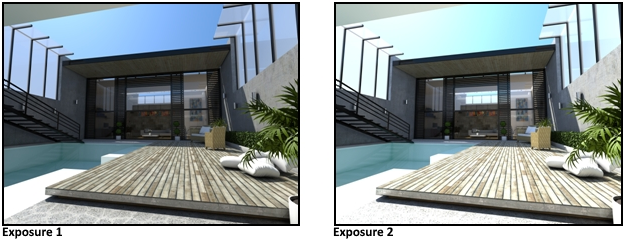 |
Gamma  Unlike exposure, it does not change the brightness level of the whole picture. It illuminates dark places more than bright places. The higher the entered value, the higher the illuminance level. The commonly used gamma value is 2.2.  |
Preset quality  The render quality can be selected from the list, from draft to very high quality. All settings will be determined automatically by the program according to the quality you choose. Initial trial renders should be taken in draft quality and low resolution, and the final renderings should work at a high or very high level according to the expectations. When Defined is selected, some settings (which are inactive when the render quality is selected from the list) become active. In this case, In this case, you can edit the settings for the render yourself. |
QMC sampling quality multiplier  Takes values ranging from 0.1 to 1.1, from draft render to very high quality. It is a parameter that helps to decrease or increase the overall render quality. When the value is lowered, the quality of imperfect reflections, frosted glass, shadow borders, material and light settings is all reduced or reduced. |
Enable ambient occlusion  Using ambient occlusion helps to make the details within the object and between objects more distinct. The higher the AO sampling number, the higher the detail quality. The AO distance value shows the activity length on the surface where ambient occlusion will be applied. 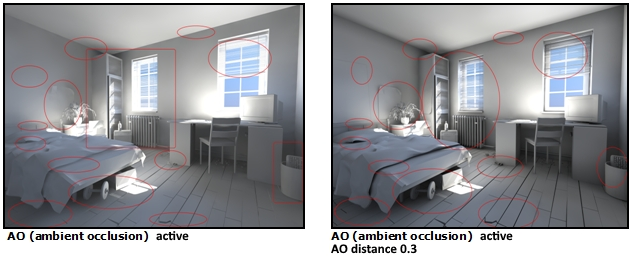 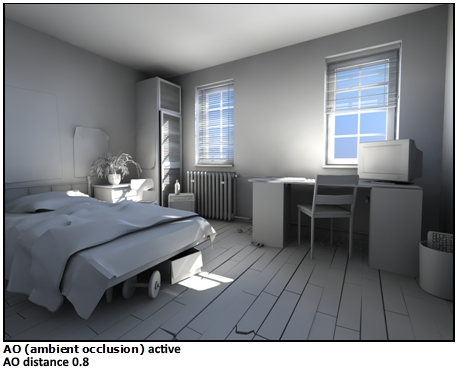 |
Anti-aliasing  It is used to correct the fractures (saw tooth appearance) on the edges of the rendered objects. Automatically assigned values are applied according to the preferred render quality. If you want to increase the precision of the correction process, the render quality is defined. A larger value is entered in the activated filter width. |
Temporarily disable grass effect  The grass/feather effect defined on the material is disabled for the rendered render only. |
Temporarily disable emission effect  The emission effect defined on the material is disabled only for the rendered render. |
Global Illumination Tab
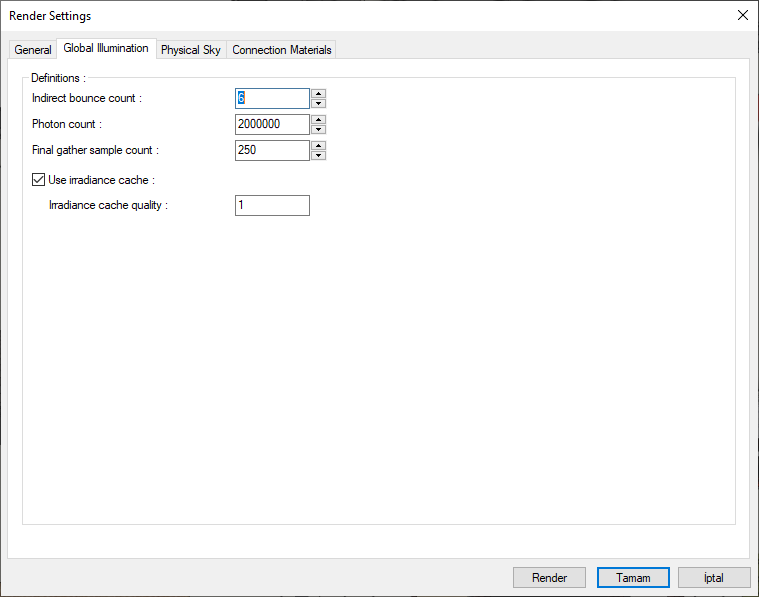
It is a lighting technique based on the calculation of light with an approach that imitates photon motion. Photons emanating from the light source hit surfaces. It reflects (bounces) from the surface it hits and hits another surface. Again, the sugar hits another surface. In this way, surfaces that do not receive direct light are illuminated with indirect lighting as in real environments.
Specifications |
|---|
Indirect bounce count  The number of times the photons will be reflected from the surfaces hit are entered numerically. |
Photon count  The number of photons emanating from the light source. The higher the number, the higher the global illumination quality. |
Final gather sample count  Final gather sample count : Apart from the surfaces hit by photons, it provides illumination of the surfaces in the middle where the photons do not hit at all by using the light calculation in the environment. As the sampling number increases, the illumination feature and quality of the surfaces in between will increase. ** Final gather sampling number enables the illumination of the shaded area between the points where photons touch. 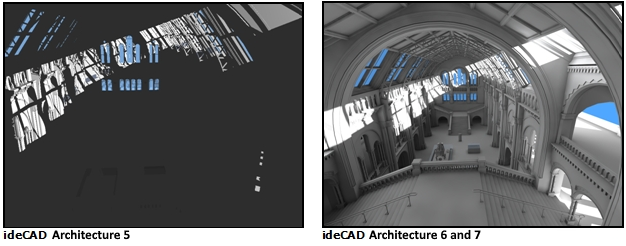 Render result in 5 version render engine: Surfaces not receiving direct light do not lighten The render result of the same scene in 6 and 7 versions with exactly the same settings: The difference between global lighting (indirect lighting) and the new rendering pattern is clearly seen in these two frames. Surfaces in shadow areas that do not receive direct light are illuminated by photon light calculations. |
Use radiance cache  Performs indirect lighting sampling at a selected set of locations in the scene, stores the results in a cache, and reuses the cached value at other points via rapid interpolation. |
Irradiance cache quality  Radiation cache quality is entered. |
Physical Sky Tab
Specifications |
|---|
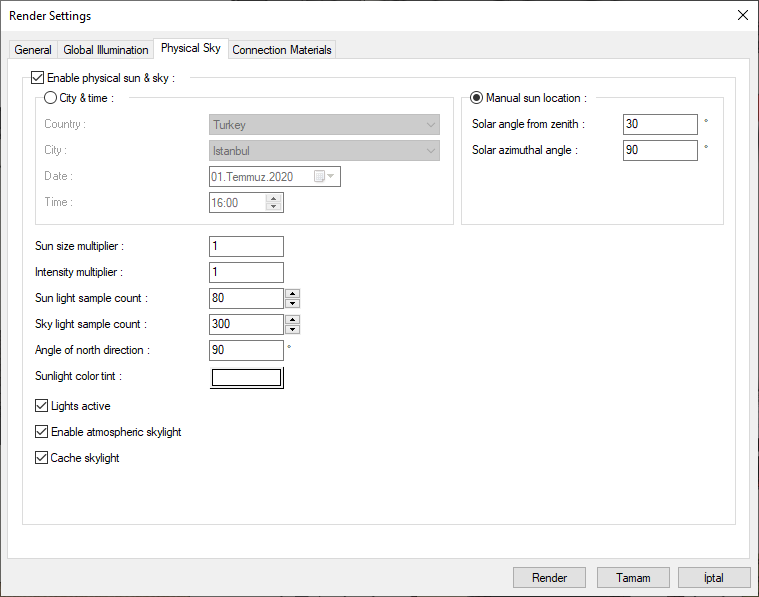
City & time  It is used to render by determining the position of the sun or using daylight according to the selected country, city, date and time. The color of the sky will also change automatically according to the position of the sun and the time of day. Physical sky (sunlight) is sufficient when rendering outdoors. In addition, there is no need to define a light source. Solar illumination can be canceled by closing the Use physical sun & sky box. |
Manual sun location  It determines the position of the sun in plan and view. |
Solar azimuthal angle  It is the angle that determines the position of the sun in the plan. It is defined in the angle logic in the X - Y coordinate plane. You can enter values between 0 degrees and 360 °. 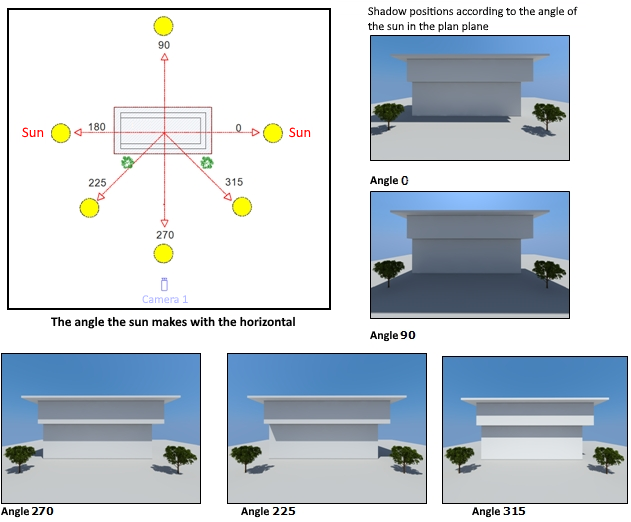 |
Solar zenith angle (vertical)  It is the angle the sun makes with the Z axis. The vertical position of the sun can be given between 0 ° and 90 °. When the angle is 0 (zero), the sun is at the top. In other words, it is the midday sun. There is no shadow at this angle. Values such as 30-40 ° correspond approximately to the afternoon sun values such as 15.00-16: 00. Angles such as 88-89-90 ° are the angle at which the sun sets. Used when wanting to render night render. 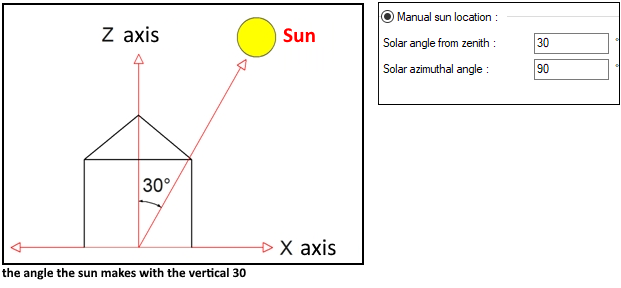 The larger the angle value, that is, the closer to the evening sun, the longer the shadow lengths. 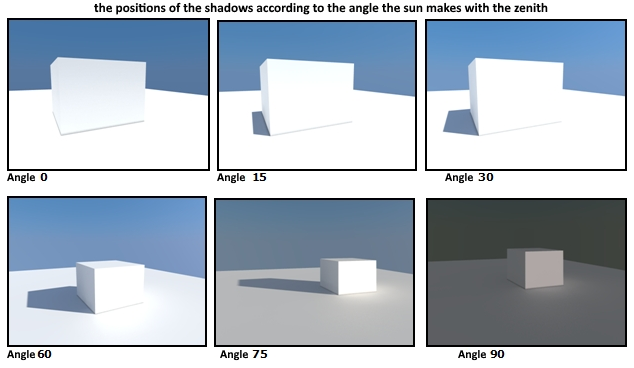 |
Sun size multiplier  It is the factor that determines the physical size of the sun. |
Intensity multiplier  It is the value that determines the strength of sunlight. |
Sun light sample count  Affects the shade created by sunlight. |
Sky light sample count  Determines the effect of the shadow created by the skylight. |
Angle of north direction  Give the angle that true north makes with the building location. |
Sunlight color tint  Select the color of the sunlight from the color palette that opens when clicked. |
Lights active  It determines whether the light sources defined with the light object in the project are active or not. |
Enable atmospheric skylight  Check the option to enable atmospheric skylight. |
Cache skylight  It is useful to have it checked for optimization. |
Connection Materials Tab
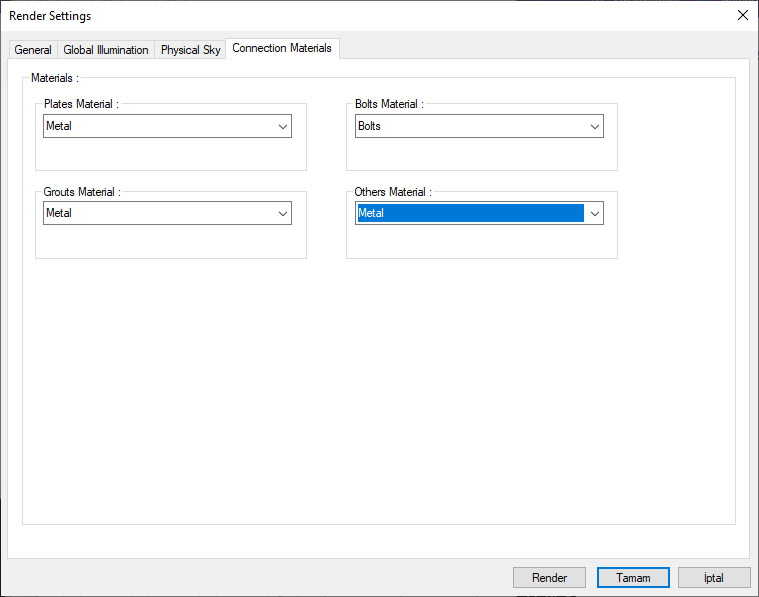
Specifications |
|---|
Plates material  You can select the material of the plates in the connections by clicking on the list. |
Bolts material  You can select the material of the bolts in the connections from the list by clicking. |
Grout material  You can select a material for the grout in the connections by clicking on the list. |
Other material  You can select the material of the elements other than plate, bolt and grout in the connections by clicking on the list. |
Next Topic
